The average household generates a staggering amount of waste each year, from discarded packaging to worn-out textiles and single-use plastics. But what if you could transform that narrative, not just by recycling, but by creating, reusing, and repurposing? Welcome to the world of DIY Projects & Crafts Inspired by Zero, a movement that doesn't just reduce your ecological footprint but ignites your creativity, saves you money, and helps build a healthier home.
It's about seeing potential where others see trash, turning forgotten items into functional art, and embracing a more resourceful way of living. If you're ready to ditch the disposable and discover the satisfaction of making things with your own hands, you're in the right place.
At a Glance: Your Zero-Waste DIY Journey
- Unleash Creativity: Turn everyday items into unique, personalized home decor and practical solutions.
- Save Big: Dramatically cut costs on store-bought items by repurposing materials you already have.
- Slash Waste: Significantly reduce your contribution to landfills by giving new life to old goods.
- Healthier Living: Create non-toxic alternatives to commercial products, free from harmful chemicals.
- Empower Yourself: Gain skills, connect with a community, and become a conscious consumer and creator.
- Start Simple: Begin with easy projects and build your zero-waste toolkit over time.
Why Go Zero-Waste DIY? More Than Just a Trend
Embracing DIY projects with a zero-waste mindset is more than just a fleeting trend; it's a profound shift towards mindful consumption and production. It’s a tangible way to counteract the throwaway culture, offering benefits that ripple through your home, your wallet, and the planet.
For starters, these projects are an incredible outlet for creativity and personalization. Imagine transforming an old pair of jeans into a stylish tote bag, or turning forgotten glass jars into elegant candle holders. Each piece you create carries a story, reflecting your unique style and commitment to sustainability. This personal touch is something mass-produced items simply can't offer.
Beyond aesthetics, the financial benefits are substantial. By utilizing materials already available at home – from fabric scraps to old tin cans – you reduce expenditure on new items. Instead of buying new cleaning supplies, you can concoct powerful, natural solutions for pennies. This frugality encourages resourcefulness, proving that you don't need a big budget to live beautifully and sustainably.
Of course, the core benefit is the dramatic reduction of waste. Every upcycled item means one less thing headed for the landfill, one less new item demanding resources for its production. It fosters a circular economy right in your own home, where materials are valued and kept in use for as long as possible.
Furthermore, many DIY zero-waste solutions promote a healthier home environment. When you make your own cleaning products, lotions, or even toothpaste, you control the ingredients, opting for natural, non-toxic components over the often harsh chemicals found in commercial products. This reduces your exposure to pollutants and allergens, making your living space safer and more breathable.
Finally, delving into zero-waste DIY projects opens doors to community engagement and educational opportunities. Sharing your creations and learning from others fosters a sense of collective purpose. You become part of a larger movement, inspiring others to adopt similar practices and collectively driving positive change. It’s an empowering journey that redefines your relationship with possessions and the planet. For those just starting their journey towards a more sustainable lifestyle, these sustainable living tips for beginners can provide a solid foundation.
Your Essential Zero-Waste DIY Toolkit
You don't need a fully stocked workshop to begin your zero-waste DIY adventure. Many of the most crucial "tools" are simply habits and readily available household items. Think of this not as a shopping list, but as a mental inventory to kickstart your resourcefulness.
First, reusable containers are paramount. Glass jars and stainless steel containers aren't just for pantry storage; they're the bedrock for everything from homemade lotions to bulk food shopping. Start saving those pasta sauce jars and jam containers! Next, a compost bin—even a small counter-top one—is a game-changer for managing kitchen scraps. Turning organic waste into nutrient-rich compost closes a vital loop in the zero-waste cycle.
Cloth bags are a no-brainer. Beyond shopping, sturdy canvas or cotton bags can store crafts, laundry, or even serve as gift wrap. For personal care, a safety razor with interchangeable blades dramatically cuts down on plastic waste compared to disposable versions. It's a small change with a big impact.
Finally, stock up on natural cleaning tools. Biodegradable brushes made from wood and natural fibers, along with washable cloths (old t-shirts make great cleaning rags!), replace endless rolls of paper towels and plastic scrubbers. The key is to look around your home with fresh eyes, identifying items that can serve multiple purposes or be given a new lease on life before buying anything new.
Transforming Your Home: DIY Decor & Furnishings
Your living space should reflect your personality, and there's no better way to achieve that than with handmade, upcycled decor. These projects infuse your home with warmth and character while keeping materials out of the landfill. Many of these DIY home decor ideas on a budget can be created using items you already own.
Walls That Whisper Stories
- Upcycled Fabric Wall Hangings: Dive into your scrap bin! Old clothes, fabric remnants, or discarded linens can be transformed into stunning wall art. Simple sewing or weaving techniques turn these textile "waste" pieces into unique, eco-friendly tapestries, telling a silent story of reuse.
- Scrap Fabric Bunting: Gather those smaller fabric scraps and cut them into triangles or rectangles. Sew or tie them onto a string or ribbon, and instantly you have festive, colorful bunting perfect for any occasion. This project is a joyful way to showcase your zero-waste philosophy.
- Picture Frames from Wood Scraps: Got some leftover wood pieces from another project? Cut and assemble them into rectangular or square frames. A little sanding, a non-toxic stain or paint, and a recycled cardboard backing complete the look, turning discarded bits into treasured display pieces.
Light, Life, & Organization
- Reusable Jar Candle Holders: Don't toss those empty candle jars or mason jars! Clean them out, and they're ready for a new purpose. Fill them with fresh wax and a new wick, or simply place a tealight inside. Customize with a lick of paint or a wrap of natural twine for a warm, personalized glow.
- Dried Flower Arrangements: Preserve the beauty of nature by drying garden or market flowers. Hang them upside down in a dark, dry space for a few weeks until they're brittle. Then, arrange them in repurposed containers like old glass jars, tin cans, or even an empty wine bottle. These timeless displays can last for years, offering enduring natural beauty.
- Reclaimed Wood Shelves: Scour local salvage yards, Facebook Marketplace, or even construction sites for reclaimed wood from old pallets or discarded furniture. With a saw, drill, and some sandpaper, you can assemble sturdy, rustic shelves. Personalize them with a non-toxic stain or paint to match your aesthetic.
- Glass Bottle Vases: Give new life to old wine bottles, soda bottles, or unique glass jars. Clean them thoroughly, remove labels, and then unleash your creativity. Paint them, wrap them in jute twine, or simply leave them clear to highlight the beauty of fresh or dried flowers.
- Repurposed Tin Can Planters: Don't let those tin cans go to waste! After a good clean, poke a few drainage holes in the bottom. Now they're ready to become eco-friendly planters for herbs, succulents, or small flowers. Decorate them with paint, fabric scraps, or even natural twine to add a touch of charm.
- Old Ladder Bookshelf: An old wooden ladder isn't just for climbing anymore. Clean it up, perhaps give it a fresh coat of paint or stain, and secure it safely against a wall. The rungs instantly become unique shelves for books, plants, or cherished decorative items, adding a quirky, functional element to your room.
- Cardboard Organizer Boxes: Cardboard boxes are a free and abundant resource. Cut and fold them into versatile storage solutions for drawers, shelves, or desks. They can be customized in size and design, perfect for organizing anything from office supplies to craft materials.
Cozy Comfort & Unique Accents
- T-Shirt Yarn Baskets: Give your tired old t-shirts a new purpose. Cut them into continuous strips to create "t-shirt yarn," stretch it out, and then coil and stitch it into sturdy storage baskets. These customizable baskets are perfect for toys, craft supplies, or laundry, drastically reducing textile waste.
- Weaving Rag Rugs: For a more substantial textile project, cut old clothes into strips and weave them together. The result is a durable, colorful rug that can withstand heavy traffic and adds a burst of personality to any room, turning textile waste into useful home items.
- Upcycled Denim Pillows: Those worn-out jeans don't need to hit the bin. Cut the denim into squares or rectangles, sew them together, and stuff them with fabric scraps, old pillow stuffing, or even more denim scraps. The result is a cozy, durable pillow with a cool, lived-in vibe.
- Wine Cork Bulletin Board: Save your wine corks! You'll need about 30-40, along with a sturdy backing material like cardboard or foam board. Arrange the corks in a pattern—herringbone, rows, or random—and secure them with a hot glue gun. Voila! An eco-friendly bulletin board for notes and photos.
- DIY Macramé Plant Hangers: Using natural cotton cord and a few simple knotting techniques, you can create beautiful macramé plant hangers. These biodegradable creations save floor space and are a stylish way to bring more greenery into your home.
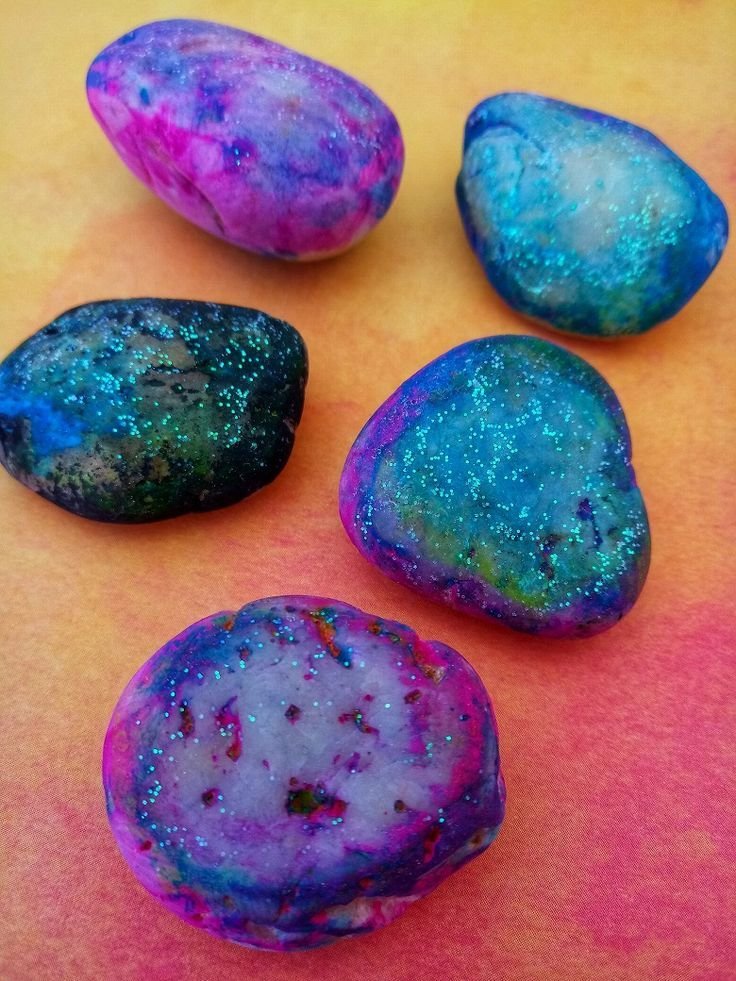
- Hand-Painted Stone Decor: Collect smooth, natural stones from your garden or a local park. With non-toxic paints and brushes, transform them into decorative garden markers, unique paperweights, or tiny pieces of art. Seal them with a clear, non-toxic sealant for longevity.
- Natural Dyes: Explore the magic of natural dyes to revitalize old fabrics or create new, unique patterns. Beetroot offers lovely pinks, turmeric creates vibrant yellows, and red cabbage can yield surprising blues and purples. It's a fun, chemical-free way to breathe new life into textiles.
Festive & Fun Holiday Decor
- Holiday Decor from Waste Materials: The holidays are notorious for generating waste, but they're also a perfect canvas for creativity. Repurpose cardboard tubes into snowflakes or ornaments, tin cans into charming candle holders or miniature planters, and glass jars into lanterns or festive vases. Old fabrics can become garlands or wreaths, and even plastic bottles can be transformed into sparkling stars or whimsical flower pots. Let your imagination lead the way to a greener celebration.
Everyday Essentials: Reusable Household Items You Can Make
The true power of zero-waste DIY lies in replacing disposable, single-use items with durable, reusable alternatives. These projects are practical, save you money in the long run, and significantly reduce your daily waste stream.
- Cloth Napkins: Say goodbye to paper napkins forever. A stack of homemade cloth napkins, sewn from old sheets, dish towels, or fabric scraps, is a simple upgrade. They're washable, durable, and instantly elevate any meal, making them a cost-effective and elegant choice.
- Unpaper Towels: These reusable fabric alternatives are superstars for cleaning spills and wiping down surfaces. Made from absorbent materials like organic cotton or bamboo, they attach to paper towel rolls (often with snaps) or simply stack neatly. Machine washable and incredibly durable, they'll drastically reduce your landfill waste.
Crafting Sustainable Food Storage
- DIY Beeswax Wraps: This is one of the most popular and effective alternatives to plastic wrap for food storage. They're breathable, antibacterial, and moldable, conforming to containers and food items with the warmth of your hands.
- Materials:
- 100% cotton fabric (pre-washed and dried), cut to desired sizes (e.g., 6″x6″, 9″x9″, 12″x12″)
- Beeswax pellets (food-grade)
- Optional: A few drops of jojoba oil or a tiny pinch of pine resin (for extra pliability and stickiness)
- Baking sheet
- Parchment paper
- Small paintbrush (for spreading wax)
- Scissors (fabric)
- Steps:
- Preheat your oven to a low 170°F (77°C).
- Line a baking sheet with parchment paper, then place a single piece of cotton fabric on top.
- Evenly sprinkle beeswax pellets over the fabric. If using, add a few drops of jojoba oil or a pinch of pine resin.
- Place the baking sheet in the preheated oven for 4-8 minutes, or until the beeswax has completely melted.
- Carefully remove the sheet. Using your paintbrush, quickly spread any melted wax evenly to cover the entire fabric. Ensure the fabric is fully saturated but not overly thick.
- Carefully pick up the wax-coated fabric (it will be hot) and hang it to cool and dry for a few minutes. It will stiffen as it cools.
- Once cool, your beeswax wrap is ready to use! Store food, cover bowls, or wrap sandwiches. To clean, simply wipe with a damp cloth and mild soap, then air dry. Avoid hot water.
- Reusable Produce Bags: These lightweight, washable bags are a must-have for grocery shopping. Sew them from sheer curtain fabric, old t-shirts, or thin organic cotton. They allow you to select and weigh produce without relying on flimsy plastic bags, dramatically reducing your plastic footprint.
- DIY Sandwich Bags: Ditch single-use plastic sandwich bags with these durable, washable alternatives.
- Materials:
- Waterproof, food-safe fabric (e.g., PUL fabric, laminated cotton)
- Sew-on Velcro strips
- Matching thread
- Scissors
- Sewing machine
- Pins
- Steps:
- Cut two identical rectangles of your chosen fabric (e.g., 8″x16″ for a standard sandwich bag, which will fold to 8″x8″).
- Place the two fabric pieces right sides together. Sew around three of the four sides, leaving one short side completely open. Use a 1/4-inch seam allowance.
- Clip the corners, then turn the bag right side out. Press the seams flat.
- Fold down the top raw edge (the open side) about 1/2 inch and press. This will be the opening where you attach the Velcro.
- Attach one strip of Velcro to the inside of the folded top edge and the other strip to the corresponding outside edge on the other side of the bag, ensuring they will meet when folded closed. Sew the Velcro strips securely in place.
- Finally, sew the open side closed with a neat topstitch, securing the Velcro and giving your bag a polished finish.
Self-Care, Sustainably: Zero-Waste Personal Products
Your personal care routine can also be a canvas for zero-waste creativity. By making your own products, you not only eliminate plastic packaging but also control the ingredients, opting for natural, nourishing elements over harsh chemicals.
- Homemade Toothpaste: Move beyond commercial tubes filled with questionable ingredients. A simple homemade toothpaste can effectively clean teeth and combat bacteria. Common recipes combine a base of coconut oil with baking soda (for abrasive cleaning), hydrogen peroxide (for whitening), xylitol powder (for sweetness and cavity prevention), activated charcoal (for extra whitening), and essential oils like peppermint or spearmint for flavor and freshness.
- DIY Mouthwash: Freshen your breath and support oral hygiene with natural, chemical-free mouthwashes. Options range from simple lemon water to blends of turmeric, parsley, and mint. Other effective recipes include minty clove, soothing aloe vera, or a powerful mix of apple cider vinegar with saltwater, each targeting bad breath and plaque naturally.
- Body Lotion Bars: These solid moisturizers are a game-changer for hydration without plastic bottles. Made from natural oils (like coconut or almond), nourishing butters (such as shea or cocoa butter), and beeswax, they melt upon skin contact, delivering rich moisture. Simply melt the ingredients together, pour into molds, and let them set.
- DIY Dryer Balls: Replace single-use dryer sheets with these eco-friendly, reusable wonders. Made from 100% wool, dryer balls reduce drying time, minimize static, and naturally soften clothes without harsh chemicals or fragrances.
- Materials:
- 4-6 skeins of 100% wool yarn (crucially, avoid "Superwash" or acrylic blends, as they won't felt)
- Crochet hook or tapestry needle
- Old pantyhose or knee-high stockings
- About 1 yard of cheap acrylic yarn (for tying, as it won't felt)
- Steps:
- Wind the Yarn: Take one skein of wool yarn and start winding it tightly into a compact ball, roughly the size of a tennis or softball. Keep it as tight as possible to prevent unraveling.
- Secure Ends: Once your ball is formed, use your crochet hook or tapestry needle to tuck the loose end of the yarn deep into the ball to secure it.
- Encapsulate: Carefully place the finished wool ball into one leg of the pantyhose. Use the acrylic yarn to tie a tight knot directly above the ball. This will keep it contained during the felting process.
- Repeat & Tie: Repeat steps 1-3 for your remaining yarn balls, placing each new ball into the pantyhose and tying a secure knot between each one. You'll end up with a "string" of yarn balls in the pantyhose.
- Felt in Washer: Place the pantyhose full of yarn balls into your washing machine with a load of laundry (or by themselves). Wash on the hottest water setting with a small amount of detergent. The hot water and agitation will cause the wool fibers to felt together.
- Felt in Dryer: Transfer the pantyhose with the balls into the dryer. Dry on high heat. The heat and tumbling will further felt and shrink the wool.
- Check & Repeat: Once dry, remove the balls from the pantyhose. Check if they are fully felted—they should be dense and firm, and you shouldn't be able to easily pull individual strands of yarn off. If they're not fully felted, place them back in the pantyhose and repeat the hot wash and high-heat dry cycle until they are. You may need to repeat 2-3 times.
- Ready to Use: Once fully felted, your DIY dryer balls are ready! Use 3-6 balls per load for reduced drying time, less static, and softer clothes.
- Natural Deodorant: Many commercial deodorants contain aluminum and other synthetic ingredients. Homemade versions utilize plant-based components like baking soda (for odor neutralization), arrowroot powder (for moisture absorption), and essential oils (like tea tree for antibacterial properties or lavender for fragrance). These formulations work with your body to neutralize odor without blocking sweat glands, offering a gentler, healthier alternative.
Sparkling Clean, Naturally: Eco-Friendly Cleaning Solutions
Transforming your cleaning routine is one of the most impactful zero-waste DIY areas. By crafting your own cleaners, you eliminate plastic bottles, reduce exposure to harsh chemicals, and save a significant amount of money.
- Homemade Laundry Detergent: This staple can be made for a fraction of the cost of store-bought versions, and it's free of synthetic fragrances and dyes.
- Liquid Recipe:
- 1 bar laundry soap (like Zote, Fels-Naptha, or Castile soap), finely shredded
- 1/2 cup washing soda
- 1/2 cup baking soda
- 1/4 cup borax (optional, for extra boost)
- Water (to fill a 5-gallon bucket)
- In a large pot, melt the shredded soap in about 1/2 gallon of hot water, stirring until fully dissolved.
- In a clean 5-gallon bucket, combine the washing soda, baking soda, and borax.
- Pour the melted soap mixture into the bucket with the dry ingredients. Stir well to combine.
- Fill the rest of the bucket with hot water, stirring continuously until everything is thoroughly mixed.
- Let the mixture sit for 12-24 hours to thicken and gel. Stir occasionally as it cools.
- Use approximately 1/2 to 1 cup per load, depending on load size and soil level.
- Powdered Recipe:
- 55 oz box washing soda
- 65 oz box borax
- 3 bars grated Castile or Fels-Naptha soap
- Optional: Oxiclean (for extra stain fighting)
- Finely grate all bars of soap using a food processor or hand grater.
- In a large container, thoroughly mix the grated soap, washing soda, and borax. If using, add Oxiclean and mix well.
- Store the mixture in an airtight container.
- Use approximately 2 tablespoons per load for a high-efficiency (HE) machine, or 1/4 cup for standard machines.
- Reusable Cleaning Pads: Just like unpaper towels, reusable cleaning pads for makeup removal or facial cleansing are an eco-friendly win. Sew them from soft organic cotton, bamboo terry, or old t-shirt fabric. They're gentle on the skin, highly effective, and machine washable, eliminating the need for disposable wipes.
- DIY All-Purpose Cleaner: This non-toxic powerhouse can tackle most surfaces in your home, from countertops to floors.
- Ingredients:
- 8 oz distilled white vinegar (a natural disinfectant and degreaser)
- 1-2 tsp Citra Solv (an optional, natural citrus degreaser)
- 1 tbsp liquid dish soap (mild, plant-based)
- 15-20 drops tea tree essential oil (antibacterial and antifungal)
- 15-20 drops other essential oil (lemon, lavender, or orange for scent)
- Water (distilled or filtered for best results)
- Steps:
- In a clean 32-ounce spray bottle, combine the distilled white vinegar, Citra Solv (if using), and liquid dish soap.
- Add the tea tree essential oil and your chosen essential oil for fragrance.
- Fill the remainder of the bottle with water, leaving a little space at the top.
- Gently shake the bottle to mix the ingredients. Do not shake vigorously if using liquid dish soap, as it can create too much foam.
- Label your bottle clearly. Shake lightly before each use.
- Soap Saver Bag: Don't let those tiny slivers of soap go to waste! A soap saver bag, made from cotton, sisal, or even an old towel, holds all your leftover soap pieces. It creates a rich lather, prevents waste, and provides gentle exfoliation while you wash.
- DIY Toilet Cleaner Tabs: These effective, eco-friendly tabs make cleaning your toilet a breeze, harnessing the power of natural ingredients.
- Ingredients:
- 1 cup baking soda (natural abrasive, deodorizer)
- 1/4 cup citric acid (powerful descaler, fizzing agent)
- 1/2 tsp vinegar (helps activate fizz, mild disinfectant)
- 1 tbsp hydrogen peroxide (whitening, disinfectant)
- 40 drops essential oil(s) (e.g., tea tree, lemon, peppermint for scent and antibacterial properties)
- Steps:
- In a large mixing bowl, combine the baking soda and citric acid thoroughly.
- In a separate small bowl, gently mix the vinegar and hydrogen peroxide.
- Very slowly add the liquid mixture to the dry ingredients, stirring constantly. Add it drop by drop or in tiny dashes to avoid a massive fizzing reaction. You're aiming for a consistency that resembles damp sand and can be packed into molds, forming small clumps.
- Once the liquid is incorporated, add the essential oils and mix well again.
- Pack the mixture firmly into silicone molds (ice cube trays or small candy molds work well). Press down firmly to compact the tabs.
- Let the tabs dry completely overnight, or for up to 24-48 hours, until they are hard and firm.
- Once dry, pop them out of the molds and store them in an airtight container away from moisture.
- To use, simply drop one tab into the toilet bowl, let it fizz and dissolve for a few minutes (or longer for a deep clean), give it a quick scrub with your toilet brush, and flush. These natural cleaning products are a testament to the power of simple, non-toxic ingredients.
Beyond the Basics: Clever Upcycling & Fun Crafts
The zero-waste philosophy extends beyond just necessities; it embraces the joy of creating and finding new uses for almost anything. These projects demonstrate the boundless potential of common discards. If you're looking for zero-waste cleaning hacks, many of the projects above fit the bill for a chemical-free home.
- Glass Jar Storage: This might seem obvious, but never underestimate the power of clean, clear glass jars. From pantry staples like pasta and grains to spices, baking supplies, and even craft bits, their airtight seals and transparent design make organization a breeze and help you see what you have, reducing food waste.
- Toilet Paper Roll Seed Starters: Before you toss that empty toilet paper roll, turn it into a biodegradable seed starter! Flatten the roll, crease it in half, then half again. Cut slits about an inch up from one end, forming four flaps. Fold these flaps inward to create a sturdy base. Place them in a tray, fill with soil, and sow your seeds. Once seedlings are ready, you can plant the entire pot directly into the garden.
- Old Jeans Tote Bag: Give worn-out denim a stylish second life. Cut old jeans into main body pieces, side panels, and a bottom. Sew them together, using the sturdy waistbands for comfortable handles. You can even incorporate existing pockets for external storage or embellish with fabric scraps.
- Plastic Bag Holder: While the ultimate goal is to avoid plastic bags, for those you inevitably acquire, a dedicated holder promotes reuse. Sew a simple fabric tube with elastic at one end and an opening at the other, or use a repurposed tin can or coffee container. Stuff your plastic bags inside for easy storage and reuse.
- Old T-Shirt Tote Bags (No-Sew): Even without a sewing machine, you can transform an old t-shirt into a functional tote bag. Cut off the sleeves and the neckline to create the bag's handles. Turn the shirt inside out and cut slits along the bottom hem to create fringe. Then, simply tie the corresponding fringe strips together to form the base of the bag. Turn it right side out, and you have a ready-to-go tote!
- Eco-Friendly Piggy Bank: Encourage both sustainability and financial awareness with a piggy bank made from natural or recycled materials. Bamboo, wood, clay, or even a repurposed metal tin can make a charming and mindful money-saving vessel.
- Bird Feeders from Old Shoes: This is a truly whimsical upcycling project! Clean out an old, sturdy shoe (a boot or a work shoe works well). Fill it with bird seed and secure it in a garden or hang it from a tree. It’s a quirky way to attract feathered friends while giving an unwearable item a new purpose. These and other easy DIY projects for kids can be a wonderful way to introduce younger family members to the joys of creative reuse.
Addressing Common Concerns: Your DIY Zero-Waste Journey
Embarking on a zero-waste DIY journey can feel daunting, but it doesn't have to be perfect from day one. Here are some quick answers to common questions and challenges:
- Where do I find materials? Your home is the best starting point! Look for old clothes, jars, cardboard, and packaging. Beyond that, explore thrift stores, freecycle groups, local construction sites (for wood scraps), or even community craft swaps. Sometimes, asking friends and family for their discards can yield treasures.
- I'm not "crafty." Can I still do this? Absolutely! Many projects, like cutting t-shirts into cleaning rags or using jars for storage, require no special skills. Start with simple tasks, watch online tutorials, and remember that "done is better than perfect." The goal is waste reduction, not Pinterest perfection.
- What if I make a mistake? Mistakes are part of the learning process! Don't let them deter you. A "failed" project might just be waiting for a different purpose or a new design idea. The beauty of DIY is the freedom to experiment.
- How do I balance DIY with convenience? It's a journey, not a destination. You don't have to make everything. Focus on areas where you generate the most waste or where DIY feels most enjoyable and impactful for you. Even swapping one commercial item for a homemade one makes a difference. Progress, not perfection, is the mantra.
The Zero-Waste DIY Mindset: A Path to Greater Impact
The journey of DIY Projects & Crafts Inspired by Zero is ultimately about more than just making things. It's about cultivating a mindset of resourcefulness, creativity, and mindful living. Each upcycled item, every homemade cleaner, and every reusable creation you bring into your life is a small act of rebellion against a wasteful culture. It’s a step towards valuing resources, understanding the lifecycle of materials, and taking personal agency in shaping a more sustainable future.
You're not just saving money or decluttering; you're developing new skills, gaining a deeper appreciation for the items you possess, and contributing to a healthier planet. It's a joyful, empowering process that transforms your relationship with your belongings and the environment. Much like the beloved character Zero from Nightmare Before Christmas represents purity and a fresh start, a zero-waste lifestyle encourages us to strip away excess and build anew, lighting the way towards a brighter, more sustainable path. So, gather your materials, spark your imagination, and start creating a home that truly reflects your values, one thoughtful project at a time.